Thursday, July 31, 2014

Embellishments that make a difference

Hey there,

it's Christine, bringing you a card made by Linda that is too cute.
Linda created this wonderful love you card using Friends in the woods. I'm not a fan of pink, neither of purple, but don't you think her watercolor-background makees the perfect dawn for those owls to fall in love?

I just love when a background created the perfect surrounding for images - and Linda did a fab job here! The silver stars are so cool! And honestly - the googly eyes made me laugh. I love those details that make an image - or a card - special.

If you could pick ANY embellishment as your favorite, what would it be? I'd probably pick wood veneers - but at the moment I use enamel dots all of the time. 
Linda's card really encourages me to take out googly eyes and use them more often...


Did you see our Guest Designer Call already?
We would love you to play along! Find all the details HERE. 

Thanks for stopping by have a nice day!


September Guest Designer Search

Here there, this is a new Guest Designer Search for September!

We're are excited to announce our Guest Designer Search for the September Release - woohoo! :)

This is what it's about:
Our Guest Designer will 
  • get one stamp set of their choice (including the September release!)
  • be featured with three posts on our blog (with at least 1 new project per post) in September/October 
  • be featured on our facebook-page, twitter, etc...

If you'd like to be that person, this is what we ask you to do:
  • Like us on Facebook
  • Create a NEW project (it does not have to be a card!) with at least one of our stamps or freebies and post it on your blog. (Feel free to combine with other stamps)
  • Add the "I love to play with Create A Smile" badge to your post, tell your readers about our Guest Design Team spot and link back to this post.
  • Leave a link to your post (not your entire blog) using the linky tool.
  • Enter as many projects as you like.
  • The linky tool closes on thursday August 14th at 8am CET (2am EST). Our Guest Designer will be announced on Friday August 15th.


Our last decision was based on the following, this might be helpful for you:
  • Great design. Not cluttered, but with detail - that's what we love (A tough combo!)
  • Impressive use of techniques. They can be simple but still have a great impact. Get the best out of out stamps!
  • Great Photography! I found out that card that really catch my eye are usually the ones with the best photo. You want your projects to SHINE so take your time to take great photos! That makes a bigger difference than you might think.
  • Fairplay. I was beyond impressed how many of you left supportive comments on each other's blog. We just love the encouraging paper crafting community!
  • Cleverness. A card that surprises me, makes me giggle or uses stamps in a way that I would never have expected are right up my Alley!
We are beyond excited to see your creations and get to know you!!!


(some of you might remember that this spot had been given away to Anja Curvers already - Anja will still be joining us, but not in September ;) )

Wednesday, July 30, 2014

Last Day with Guest Designer Cindy Lovell

Wow, time really flies by, this is already our last creation of Guest Designer Cindy Lovell.

Cindy, it was wonderful to have to - we loved your creations and we know our readers did, too!

Cindy created a fabulous scene and just like Kelly did yesterday she created a background by masking. I guess our friends in the woods like to be put into scenes :) I love Cindys color combo and how she combined all the different elements. See those tiny hearts? How cool is that?

Here's what Cindy says about her card:
I kept my card pretty simple today.I choose the adorable squirrel from Friends in the Woods, which I cut out leaving a small white border and colored it with Twin Touch Markers. The background was created using Tumbled Glass and Peeled Paint distress inks. I made my own little hills with masking paper. The cute little tree trunk and the hearts above the sentiment come from an older Hero Arts Set called Whoo loves you. The sentiment comes from My Creative Time's Bracket Sentiments. I white heat embossed the sentiment and the hearts.The sun is from Simon Says Stamp's Color and Sunshine Set. And to finish my card, I of course used some MME Enamel Dots!


Awesome creation, Cindy! Thanks again for being our Guest - I hope we'll work together again some day :)

Did you know our next Design Team Call starts TOMORROW?
So if you want to be our Guest soon check back tomorrow to get all the details.

Have a nice day everyone!

Tuesday, July 29, 2014

Let's Make A Scene

Hello crafters! 

It's Kelly here and this week I'm are switching it up a bit. Instead of three cards I decided to do a photo tutorial showing how I "create a scene" on my cards. Some of my favorite ways to use adorable little critters, like the ones in Friends in the Woods, is to create a scene for them. 

Warning this is a picture heavy post. I also created two other scene cards using the same methods as this one. You can see them on my blog here

Let's get at it! 


First I stamp/draw/trim all of my masks. For this card I knew I wanted it to be framed so I used a spellbinders die to create that. I also drew some hills and trimmed them out. You will need the top (sky) portion and the bottom (hills) to create your scene. The Fox is my focal point and the circle will mask my sun. Yes those masks are the hedgehog but we are going to be using them a bit differently. I use Tombo Mono Multi-Glue to hold down my masks. Once the glue is dry is reposistionable.  If you you do this make sure you smear it out onto the edges otherwise it will peel up when you rub on your distress ink. 


Place your frame onto your card panel. I find it easier to precut the mask to the same size as my card front that way I don't have to mess around with getting it centered. 


Lay down your hills however you want them to be laid out. and lightly trace the top edges. Remove. 


Stamp your Fox using the traced line as a guide. If you are using distress ink you don't need to erase the line. The ink rubs it off. If you are using another medium erase it. Especially copics! If you go over a pencil line with a copic it is NOT erasable after. Ask me how I know :/


Lay down your fox mask. Place your sun mask over top of it and then replace the hills. 


Stamp and mask the hedgehog to create a cluster of bushes. 


Time to add some color! I used squeezed lemonade, mustard seed, and wild honey. I wanted a sunset look so i made the horizon darker. 


Remove the sun mask and hedgehog masks. Leave the fox mask. 


Mask the sky. **Warning** if your distress ink is still wet it sometimes gives you a hard time about sticking. I can usually hold it with my hands if not I'll tape it to my desk. 


Add your greens. I used mowed lawn, peeled paint, and forest moss. Leave the top lighter to get a highlighted hill. 


Replace the mask for the lower hill. Why you ask? Anything the is darker automatically looks as if it's further away. We are creating dimension by making the top hill darker. Add more green making sure it is darker than your previous application. 


Remove all masks See pretty hills :) 
Next remove your fox and bush masks so you can color those images. 


I chose to color my images with more distress inks and a H20 pen but you can use anything. Copics, markers, colored pencils whatever floats your boat. Once done remove all masks and create your card! 


I trimmed my panel down and mounted it on a yellow card front.  I added some sparkle to the sun and some black enamel accents to the Fox's eyes and nose. I also used a bit of twine to accent my sentiment from the Comfy Set. 

If you have any questions please let me know. Also if you would like to see other examples of scenes I've created you can go here.

Thanks so much for stopping by! I hope I inspired you to make a scene :) 

XoXo

Kelly 


Monday, July 28, 2014

Some thoughts on Distress Markers

Happy monday!

Hope your week started just as wonderful as mine (I have 3,5 weeks off - yay!).

Today I'd like to share some thoughts on Distress Markers. I got my markers on Saturday and played around a LOT - but don't really get the point of having Distress Markers. Don't get me wrong, I had lots of fun. They're easy to use, come in all the great Distress colors and have a fine tip so you can write sentiments or add accents in matching colors, but I have to say I am not too happy with the coloring results, because

  • the colors aren't very bright after using water
  • some of the colors don't blend well and you see the strokes too well
  • some color even change when they are in contact with water
See my video for all the details on that:


I tried to take a good photo of how ripe persimmon changes after using water (and drying):


Crazy, right?
But as I said in the video: I'll still buy more. I really love the idea of writing something in the same color like I stamped or colored and I think they're fun to play with. Some colors are really awesome and react well - maybe I'll make a chart some day - hehe :)

What are your experiences with Distress Markers? Do you like them? Even love them? Or have you ever been disappointed just like me? 

Well, I didn't give up and created a card using them. For the orange I had to add Distress Ink from my inkpads (Some brushed corduroy and spiced marmelade), but the result is nice, right? The sentiment is from Mias Stempelküche  - she has many beautiful German sentiments ;)


Thanks for stopping by and taking time for my thoughts :)

Christine

Friends in the wood


Sunday, July 27, 2014

Hi und Good Bye!

Hello everybody,

Tanja here. It's my second and already last post on the Create a smile stage today. There are a few personal reasons for my (harsh) decision to leave the designteam.
I'm so sad. I will miss all these most talented, kind, always helpful and so funny ladies of this wonderful team.

Last but not least a big thank you to Christine.
She let me be a part of it all. A part of the birth of her (our) baby called Create A Amile. Christine, you are the best. I don't know a lot of people with so much talent and burning ambition. It's thrilling. I learned so much from you. Thanks for your support. Always patient with me *lol*
Perhaps I can come back one day !? Who knows...

Stop! Now it's enough. Otherwise I'll start to cry.

Now here is my project. It's not a card - it's a little gift for someone who needs a break (myself? *lol*)
It's a wrapping for bath salts. And bath salts perfectly fit together with the bath tub from the stamp set Comfy, don't they?

Close up:

I hope the different pictures explain how it works.
I have a die to create the package (with my Bigshot). I glued the workpiece together and decorated it with twine (wink to Christine).
Then I attached the bath tub and I used crystal effects to immitate water drops.
That's all.

Here with the bath salts behind the package:


And here the bath salts inside:


Hope you found some inspiration in my post today.


Thank you all for supporting me.
Take care of yourself.

Hugs
Tanja


Saturday, July 26, 2014

To tell the tooth...

... I love Mr. Beaver! All the critters from Friends in the Woods are so cute!
Anni here to share another card with you.

Embossing paste is a big hit right now and there are so many things you can do with it.
Embossing paste alone is a great thing. You can add subtle structure for interest with it.
After drying you can color the embossing paste with Distress inks or with Distress Stains.
Or you can add glitter or embossing powder!
For this card I mixed the embossing paste with ink from an ink pad. But you can add different colors, too. I didn't found a color yet that didn't work!


So many opportunities! What do you do with your embossing paste?

Friday, July 25, 2014

Clean and Simple Comfy Card

Hello and happy Friday!
Samantha here again, and today I have a really clean and simple card that I created with distress markers!

Like most of you, I'm sure, I like to try to combine images in a stamp set in new ways! That's how this card came to be!


I used the images from the newly released Comfy stamp set, and colored them with distress markers!
LOVE the look of watercoloring, even if it's just to color an image!

And isn't that kitty so cute in the tub? Lol!
I cut out around his back leg so i could place him IN the tub, and then popped up his head and front paws so there was a little bit of dimension!


He looks like he's just relaxing in the tub! I love it!
I also added the bubbles coming out, and hit those with some wink of stella to add a bit of glitter!

The sentiment is a combination of phrases from the Friends in the Woods and Comfy stamp sets!
I LOVE making new and custom sentiments!

So that's what I have to share today!
Are you following us on Facebook yet? You're going to defintely want to like us there!

Thanks for stopping by again!
Catch you next Friday!
~Samantha

Thursday, July 24, 2014

The Goose has Landed!!!!!!!!!!!!!

Huzzah!!

The goose arrived and the poor lost soul had my stamps still attached! (Goes to show how well ribbon attaches things!)
I tried to get a photo of her but she went straight to sleep after I detached the package from her mail bag.

Thank you all for the well-wishes for Goosey, I've passed them on to her and she HONKED loudly and with gratitude :)

So finally, I have my stamps! WOOHOO!!


I wanted to make a card that reflects the current weather here in Australia, which is winter!

In Perth, where I live, winter isn't very wintery at all. In fact it's a lot more like autumn, so I went with that.

I was looking at my stamps and I love how the fox looks kind of pensive, like he's thinking about something serious. I wanted to create a card that felt pensive and simple, so this is what I came up with;


I used the little branch stamp from Friends' In the Woods, as tree branches (I just bent them on my acrylic block so they went in different directions, masked it off in places and stamped repeatedly to create the branch-effect).

I then added LOTS of leaves in Autumnal colours.

I hope you like what I made! I kept it nice and simple AND I used my most-difficult colour for the background card--ORANGE. it's a tough one for me!

See you again next week!

Linda xx


Wednesday, July 23, 2014

Guest Designer Cindy Lovell - Part 2

Hello crafty friends!

I love the wednesdays with our Guest Designers bringing awesome inspiration to our Blog.
Cindy Lovell  created a wonderful tag using Friends In The Woods. That design is stunning! (And pink+orange+yellow is one of the hottest color combos EVER! And I don't even like pink a lot, it's just that combo that makes me swoon!)

Let's see what Cindy's got to say about her tag:

"I die cut my Tag with the Tag Dies from My Creative Time and used Hero Arts Woodgrain Stamp, white heat embossed it and went over it with Mustard Seed, Ripe Persimmon and Picked Raspberry Distress Inks.The leaves where also die cut using Clearly Besotted's Leafy Accents out of Vellum and Black Cardstock.I  stamped the Hello My using My Creative Time's Label Font Alpha and used some Glossy Accents for a more realistic finish.I used some Wink of Stella on the word die from Clearly Besotted and the black leaves for a nice shine.
And of course the super cute Owl from Create a Smile's Friends in the Woods Set,which i water colored using the same distress inks and fuzzy cut it,leaving a small white border around it.Some enamel dots and i called it finished! :)"


Don't you think is is super-trendy? The combination of fonts, die-cuts and enamel dots create the perfect background for our little owl. I am seriously in love with this tag.

By the way - what do you use your tags for? I sometimes attach them to little gifts or use them on cards, but I'm not very creative about the use of tags.  Sometimes I use them as a bookmark (but they need to be flat than, which is a pity because I love dimension! :)

Don't forget to enter your challenge Idea to our Facebook-Wall (only some hours left) to win a 10% off coupon for our shop. (And we know you'll love the August release! :) )


Tuesday, July 22, 2014

When is an Umbrella not an Umbrella?

Hello Crafters!

It's Kelly here bringing you a different take on our Comfy set. One of my favorite things to do is to take stamps I already own and find different ways to use them. Hence the title of this post, hehe, see what I did there?! ;)
Here is the whole set, which I adore but for today I decided to make three cards using just the umbrella and a few sentiments from Friends in the Woods. So let's get to answering this question: When is an umbrella NOT an umbrella?

Here we go

Super Simple:


When it is a flower! I stamped the umbrellas and trimmed off the post. I colored them with distress inks and drew stems with a ruler. In hindsight I kind of wish I had added some leaves but I'm pretty happy with how clean it is. The sentiment was a combo with some masking. I love that black stripe from Echo Park. Honestly, I have multiple packs of the dots and stripes just for this paper :) 

Middle of the Road:


Colorful border anyone? I love how the colors pop against the black stripe. I got a little dot happy with my black enamel but I felt like all that white space needed something to draw the eye. 

Kinda Busy:


Normally the kinda busy card is not my favorite but this time it is basically because I love butterflies :) They are just so happy you know? I trimmed off the top of the umbrella so the wings would be more separated and then used part of the branch from Friends in the Woods to create the body. A couple of dots with the white gel pen and BAM butterfly :) 

Do you see other ways to  use this stamp? Please share with me! I love to find new ways to use them and I hope I helped you to see them in a different light too! After all we are all here to inspire one another <3 

I also wanted to let you know that we are doing a special blog hop for the August release. One where you get to pick what type of cards you want to see! Head over to our Facebook page and throw your ideas in the hat. If your idea gets picked you get 10% your order! How cool is that?! 

Thanks for stopping by! 

XoXo

Kelly 


Monday, July 21, 2014

White Outlines + watercolor = Yummy love

Hello and welcome to a wonderful new week here at Create A Smile!

First of all I'd like to tell you about our Play-Time on our Facebook-Page. If you'd like to challenge our Design Team (and our guests) - enter your challenge idea in the comments of the play-time posts.
Every DT member and Guest will pick one of YOUR challenges for the August Blog Hop. If one of us picks your challenge you'll win a 10%off-coupon for August!


That sounds like fun and we can't wait to read all your ideas!

Today I'd like to cards with you that share the same awesome technique: White embossed outlines and coloring with watercolor.

I am really not a genius when it comes to coloring with watercolors, but you can hardly go wrong with this technique - and the results are always beautiful and kind of "different" to all the black stamped images that we all usually use.

These are the cards that I created:

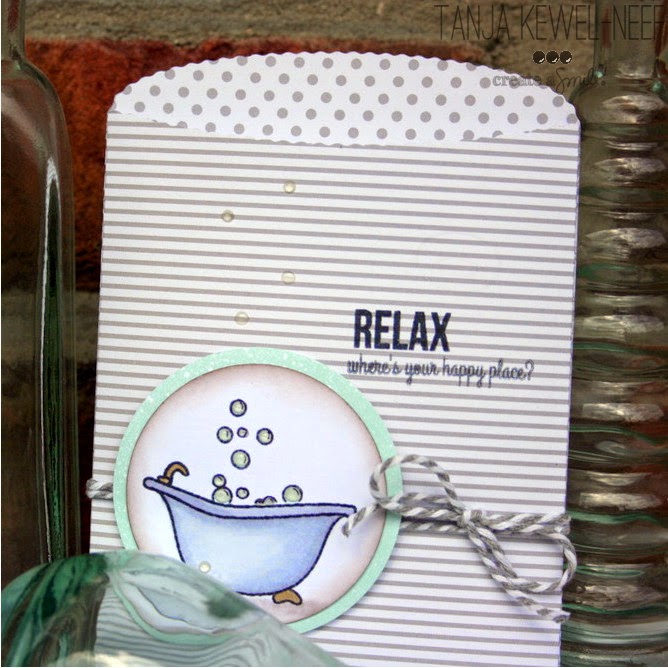
1) Need a break? Relax
A very clean and simple One-layer card, but still eye-catching because of those white lines, don't you think?

I used the umbrella from Comfy on this card, stamped it with Versamark a few times, embossing with WOW! Clear Gloss super fine embossing powder (I am in love with that stuff because it melts to a really smooth and glossy surface!) and added Distress inks with a brush and water.


This is how I do it:
I press my inkpad onto an acrylic block and ad lots of water to one portion of the ink on the block. I use this wet color to give one are a wash. Then i take some of the not so wet color and dip it onto the area that should be darker. Blending happens on it's own - the watercolor does the rest.


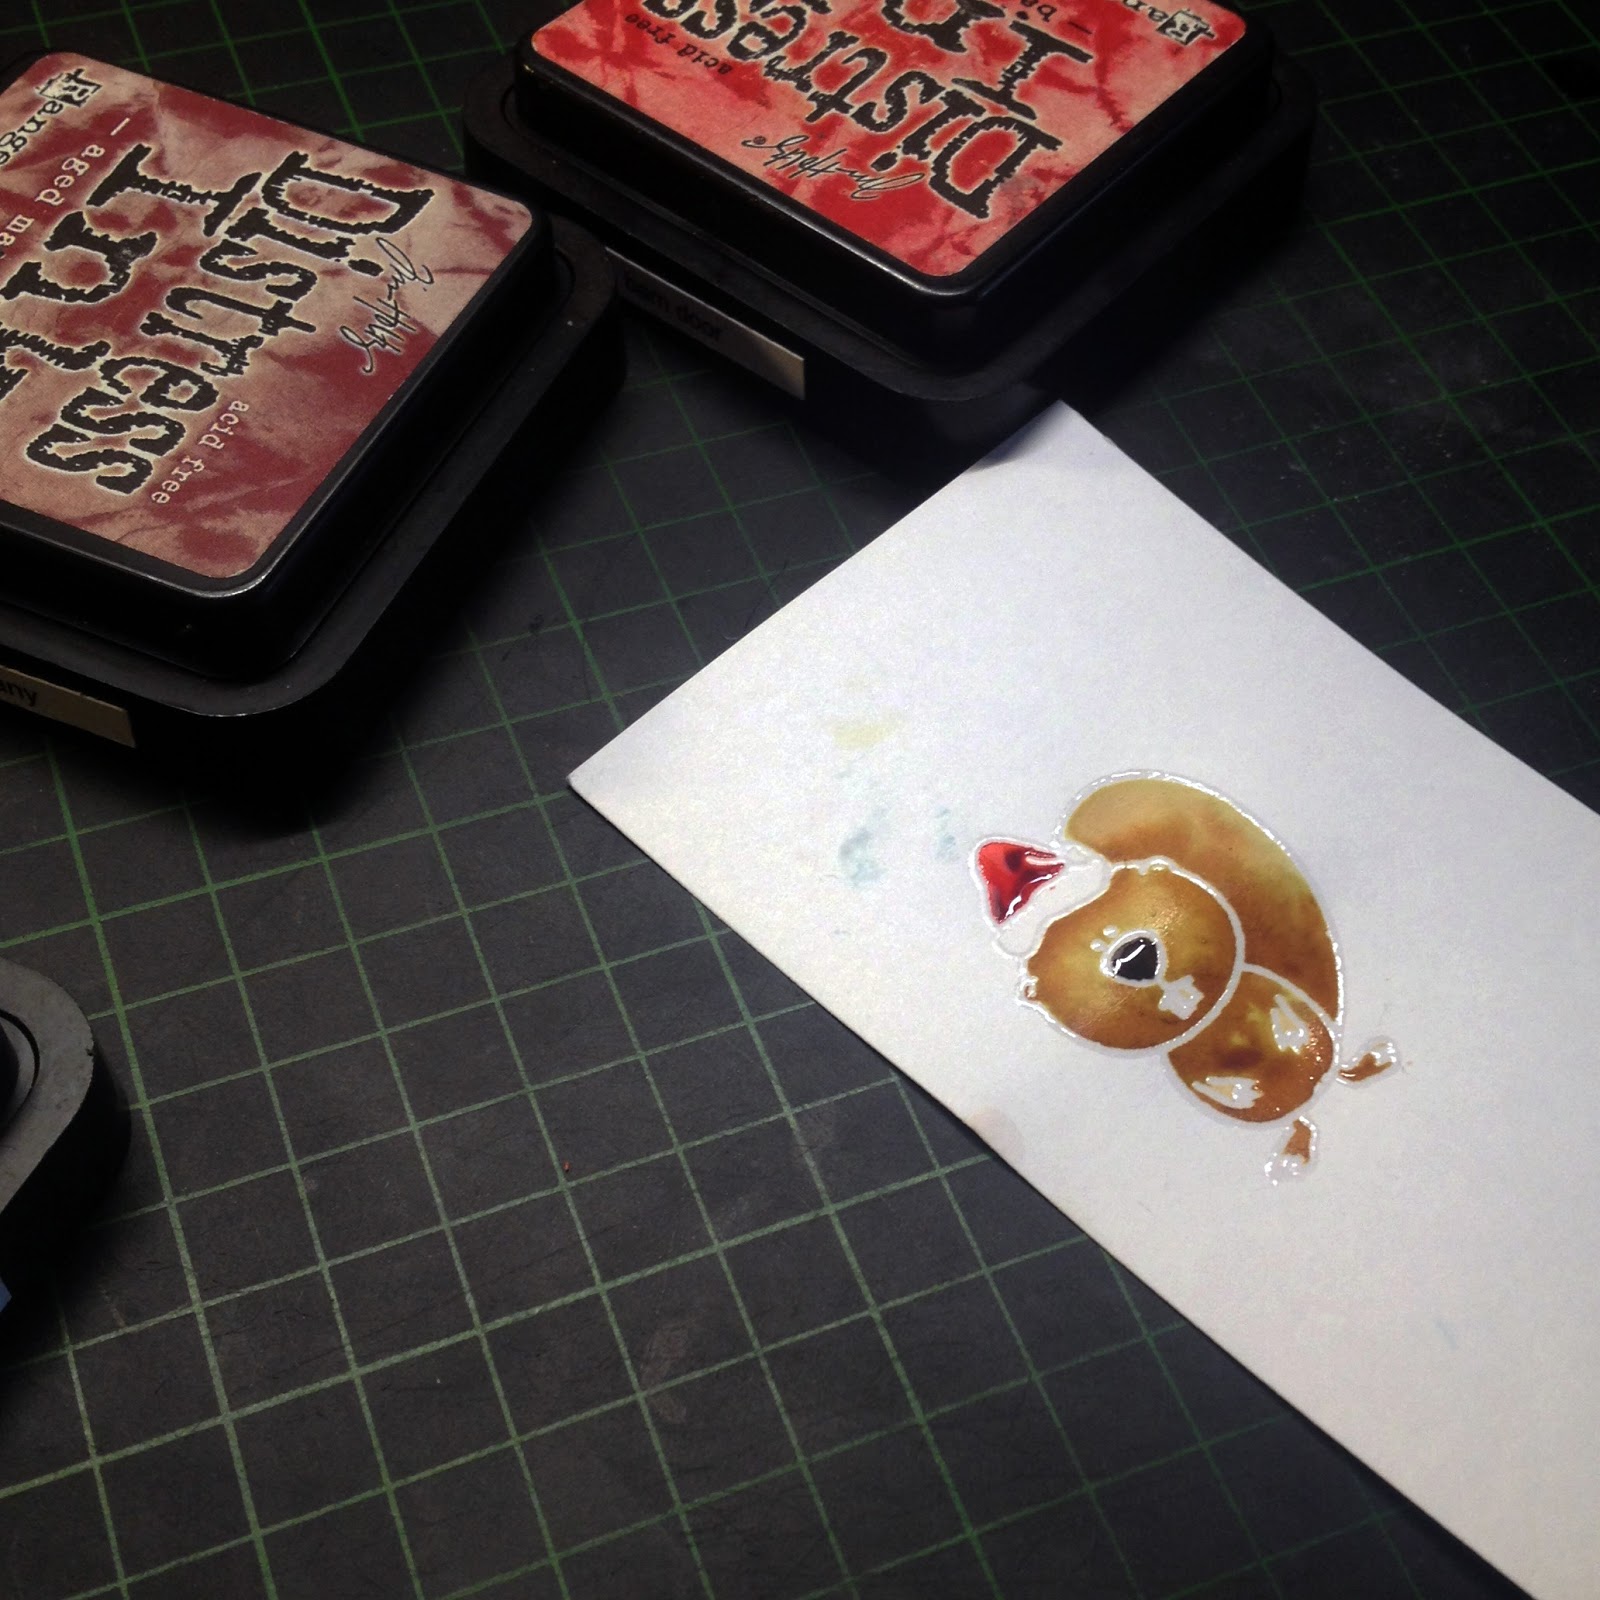
And here's the second card that I created - a christmas card!


I think this beaver look stunning with this technique. I stamped the christmas hat first, embosst ist and  masked it when I stamped the beaver. When the beaver was colored I started adding snowflakes and a sentiments from Hero Arts. (spoileralarm: maybe we'll have some Create A Smile snowflakes soon...;) )
After I stamped the background I added a wash of tumbled glass and added some stormy sky around the beaver to have a shadow and some contrast. I seriously love how this turned out.
After the card was assembled I added Glossy Accents to his nose and the speech bubble with some Sequins from Neat & Tangled. Glossy Accents make everything look more interesting, right? I might be Glossy Accents addicted.


What's you favorite coloring technique or a technique you really like to use? Why don't you leave a link to your blog so we can come over and have a look?

Thanks for stopping by, have a nice week!
Christine


Friends in the wood